Reimbursing an Employee for an Expense
OBJECTIVE
One of your employees pays parking fees to visit a customer or invites a customer to supper, but he does not have a company credit card. So must reimburse these expenses that were incurred on behalf of the company.
There are several ways to reimburse expenses in maestro*. Below are the two most commonly used methods.
The costs are allocated to projects in both cases.
|
Method |
Advantages and limitations of the method used |
|---|---|
|
The advantages of entering a bonus in time entry are:
The limitations of the method are:
|
|
|
The advantage of using a project purchase is that the tax amounts can be adjusted if necessary. Limitation Requires you to handle the employee as a supplier. |
PROCEDURE
Method 1: Reimbursing an employee by entering a bonus in time entry
This is the easiest method because the employee submits his expenses on his time sheet. If you need to reimburse multiple expenses, we recommend using method 2.
|
Using a bonus results in the bonus being included on the pay stub. |
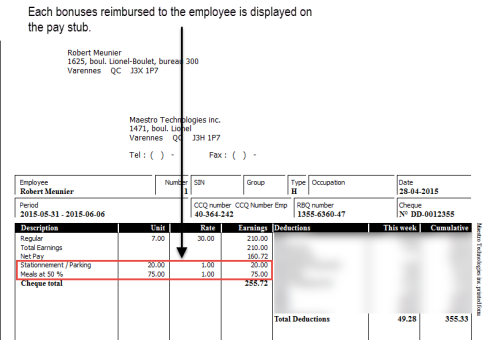
For example, if an employee paid parking fees ($20) to visit a customer downtown and the employee invited the customer to supper (meal cost $75).
His pay stub will read:
- Parking fees ($20)
- Meal expenses ($75)
Step 1: Setting up bonuses before reimbursing expenses
Whether parking fees or meal expenses are being reimbursed, the taxes to be collected are not the same. In Québec, 50% of the taxes paid can be recovered for entertainment expenses and 100% of taxes paid for parking fees can be recovered.
|
Please refer to the government web site for your province to check the tax rules applicable to paid taxes. |
For this, you must create two bonus codes with different tax rates to correctly recover your taxes.
- On the left side of the main maestro* window, click the Time Management module, and then Maintenance.
- In the section on the right, in the Payroll group, click Define Earning/Deduction Codes. The Define Earning/Deduction Codes window is displayed.
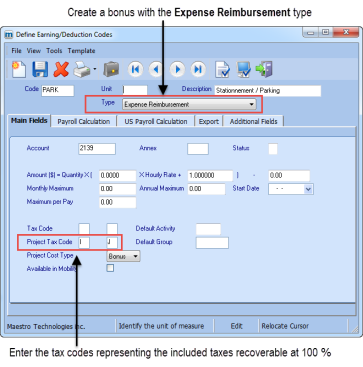
- For example, create a bonus for parking expenses with taxes included and taxes are 100% recoverable.
The tax codes must be entered in the Project Tax Code field since the bonus will be entered in the Enter Hours option. For more information on creating tax codes, please refer to Help (F1) on Tax Code Table.
Do not enter tax codes in both locations (Tax Code and Project Tax Code) or they will be recovered twice.
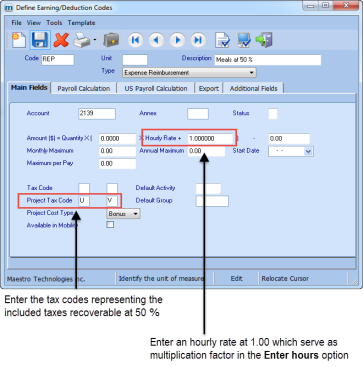
Another bonus representing meals expenses for which 50% of the taxes are recoverable.
Step 2: Entering expenses in time entry
If the employee submits his expense receipts with his time sheet, we recommend entering them during time entry.
- On the left side of the main maestro* window, click the Time Management module, and then Project Time.
- In the section on the right, in the Processing group, click Enter Hours. The Enter Hours window is displayed.
- Enter the employee's hours and, on the following lines, list the bonuses to be reimbursed to the employee. In the example below, the REP and PARK bonuses are used.
Enter the total amount to be reimbursed (taxes included) in the Hours column.

- Click Save and then transfer the hours.
The bonuses will be transferred to the payroll module at the Compile and Load Project Hours stage.
- Continue payroll processing normally.
When the pay cheque is printed, the reimbursed expenses are included on the pay stub.
If the hours processing method is balanced, the taxes will be posted during the Payroll Reconciliation stage and only after the user answers YES to the question Do you want to post these amounts?
Otherwise, the taxes will be posted during payroll, at the Transfer to Accounting stage.
Method 2: Reimbursing expenses to an employee by issuing a cheque or by making a direct supplier payment
This method involves using a detailed expense report to enter the various expenses incurred by an employee in various projects (administrative or other) as a project purchase.
|
To enter a project purchase, a supplier is required. |
Using this method, a cheque is issued to the employee. If the Direct Supplier Payment module is installed, a direct payment can also be made to the employee, but in this case, a supplier file must be created for each employee.
Step 1: Creating a supplier
|
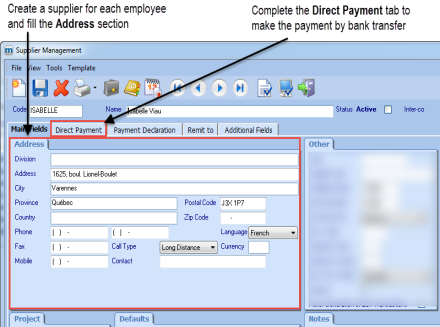
A supplier file is usually created for each employee to whom the company reimburses expenses. Another option is to create a single MISCELLANEOUS supplier and to select the address when entering the project purchase. |
Create a supplier file
- On the left side of the main maestro* window, click the Purchasing module, and then Maintenance.
- In the section on the right, in the Suppliers group, click Supplier Management. The Supplier Management window is displayed.
- Complete the information paying particular attention to the following table depending on the supplier created:
Representative Supplier
Tabs or sections to be completed
Notes
Employee
Basic Fields tab
- Address
Direct Payment tab (optional)
For each employee, create a separate file (refer to Figure 5 – Supplier file representing an employee)
Complete the Direct Payment tab if you want to use direct supplier payments.
Different employees
No sections to be completed
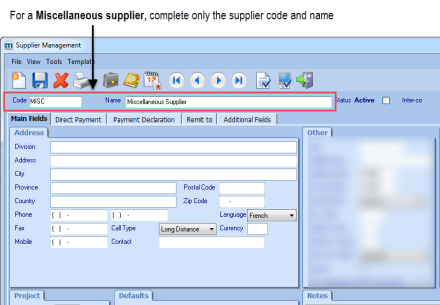
Create a MISCELLANEOUS supplier to represent multiple employees by entering the following information:
- Code and description only.
The employee's address will be indicated when the purchase is entered.
You must specify the MISCELLANEOUS supplier in settings to display the address selection window in project purchases. Refer to the appendix for the procedure.
In this context, you cannot use a direct supplier payment.
- Click Save.
Step 2: Enter the expenses to be reimbursed to the employee from the project purchase
By entering expenses from the project purchase, you will have to select the tax codes to be recovered manually.
Enter a project purchase
- On the left side of the main maestro* window, click the Purchasing module, and then Purchasing.
- In the section on the right, in the Purchasing group, click Project Purchase. The Project Purchase window is displayed.
- Enter the project purchase, paying particular attention to the following information:
Field
Action
Grade
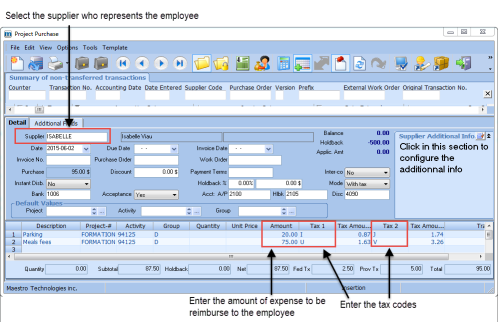
Supplier
Select the supplier that represents the employee or the Miscellaneous supplier.
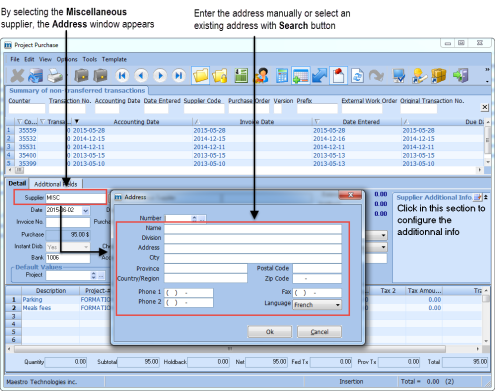
When the Miscellaneous supplier is selected, an Address window is displayed.
Select an existing address by clicking the Search icon, or enter the employee's name and address manually.
Instant Disb.
Select Yes to issue a cheque immediately.
A cheque will be issued after the purchase is transferred.
Amount
Enter the amount of the expense.
Be careful to enter the amount with taxes included if the selected taxes are included.
The amount of expenses displayed in projects does not include taxes.
Tax 1 and
Tax 2
Select the applicable taxes.
For additional information on the various fields in this option, please refer to help (F1) on Project Purchase.
- Transfer the project purchase and continue processing the purchase until the payment is issued.
If the Instant Disb field is set to YES, please print the cheque. Otherwise, you will have to create the payment in the Selected Disbursements option.
See also
- Define Earning/Deduction Codes
- Enter Hours
- Payroll Reconciliation
- Supplier Management
- Project Purchase
- Configuration
APPENDIX
Activating the MISCELLANEOUS supplier
This setting is required if a miscellaneous supplier is used in project purchases. By specifying the MISCELLANEOUS supplier in Configuration in the Purchasing module, you are telling maestro* to display an address selection window when the miscellaneous supplier is selected.
Specify the miscellaneous supplier
- On the left side of the main maestro* window, click the Purchasing module, and then Maintenance.
- In the section on the right, in the Suppliers group, click Configuration. The Configuration window is displayed.
- In the menu on the left, click Purchases.
- In the Purchases section, select the miscellaneous supplier.
- Click Save and then Quit.
